Introduction:
To wrap
up our Priory navigation activities, this week my class and I navigated the
Priory with both a GPS unit and a map we created. This combined work that we
did for the past three activities—making a navigation map, navigating with only
the map (distance and azimuth), and navigating with only a GPS unit. To make
things a little more interesting, we also added a paintball component for this
week’s navigation.
The
goal for this week is slightly different than those of the past. For the first
two navigation tasks, we had to navigate a course using only one method of
navigation—either a distance-azimuth technique or using a GPS—and were only
expected to find five points set out in one course of three by our professor. We
had no time limit except to complete the activity within a three hour period. This
week, we were given both maps and a GPS unit and were expected to navigate to
all of the points in all three courses for a total of fifteen points. Not only
did we have to find each point in the field, but we also had to compete with
other teams to navigate and return to our beginning point the fastest. If a
team member was hit by a paintball, the team had to stop navigating for two
minutes before they could resume. There were also specific zones set out that
we were not allowed to enter because we were using the paintball equipment. Any
areas near the Priory building, which is a daycare, or near a highway were
off-limits so that we didn’t scare anyone by running around with masks and
guns.
Study
Area:
The
area we have been working in is known as the Priory and is owned by the
University of Wisconsin-Eau Claire. It is located on the south side of the city
of Eau Claire in Wisconsin in a more rural setting. The Priory is a hilly area
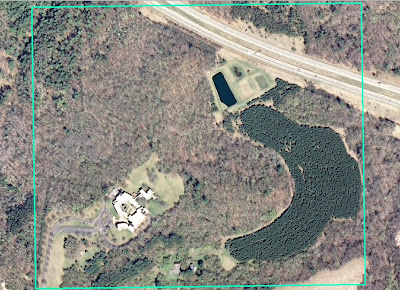
with several steep ridges and gorges and is mostly wooded (Figure 1). There are some open
areas near the Priory building, a house, and a waste pond located on the site,
however (Figure 1). Because we have been navigating
the Priory in the month of March in Wisconsin, the site was covered in a deep
layer of snow. This definitely made the navigation more physically straining
and called for proper attire, but it was beneficial as well because we were
able to spot our navigation points rather easily as they stuck out against the
white of the snow.
 |
| Figure 1: This is an aerial image of the Priory in Eau Claire, Wisconsin. The outline defines our navigation boundary. As can be seen, most of the area is covered in trees. |
Summaries
of Past Activities:
In
order to better understand and compare the activities over the past few weeks,
it is important to summarize the goals and methods of each week’s activity.
Week 1:
Creating a navigation map:
For
Week 1, we were divided into our groups of three and created the maps we would
be using to navigate the Priory in Week 2 using distance and azimuth
techniques. The goal was to create a clear, concise map that would be
informative and easy to use in the field. Each person created two maps—one that
focused around an aerial photo of the area and another that focused on the
elevation (Figures 2 and 3). By the end of the week, we had to choose two maps that we thought
would best suit us for our navigation (Figures 3 and 6).
The
aerial maps included five meter contour lines, an aerial image, a grid system,
and a study area outline while the elevation map had two-foot contour lines, a
DEM, and underlying aerial image, and a study area outline. We selected a UTM
coordinate system to work in because it is true to distances and suited our
rather small study area well. Unfortunately, my group and I chose two maps that
were unsuitable for navigation because they either did not include a grid
system or were in the incorrect coordinate system. This was later corrected,
but not before we had to complete the navigation (Figures 4 and 5).
Figure 2: This is the aerial map I created during Week 1 for the distance azimuth navigation. It was not chosen for one of our final maps.
Figure 3: This is the elevation map I made during Week 1 to use for the distance-azimuth navigation. It was chosen to be one of our final maps that we would use in the field.
Figure 4: This is a portion of the elevation map I created for our distance-azimuth navigation (Figure 3). This is showing the labels for the grid system of the map which is in the incorrect coordinate system--Transverse Mercator.
Figure 5: This is a portion of the elevation map I created for our distance-azimuth navigation after it had been corrected. This is now in the UTM coordinate system and can be compared with Figure 4.
Figure 6: This is the aerial map my group and I chose for the distance-azimuth field navigation. It was created by Kory Dercks.
We also
set a pace count during this first week that we would later use in our
distance-azimuth navigation. The pace count is set for a 100 meter distance and
is used to calculate distance in the field when no other tools are available.
My pace count was about 65 strides for 100 meters.
Week 2:
Distance-Azimuth Navigation:
The
objective of Week 2 was to navigate the Priory using only a map and compass. We
worked in our groups of three and were expected to navigate to six different
points in the Priory set out by our professor. Before we could head out into
the field, we had to plot our points on our map by matching the coordinates
given to us with the X, Y coordinates on our map. Because neither of the maps
we selected from Week 1 had the correct grid system, we had to use an extra map
from another group (Figure 7).
Figure 7: This is the map we used to navigate the Priory after we found out that both of the maps we selected were unsuitable. It was created by another student in the class.
Next, we learned how to use a compass to find the azimuth
from one point on our map to the next (Figure 8). The steps to finding the azimuth go as
follows:
- Draw lines from one point
to the next on our map. This makes it easier when it comes time to measure
the angle and distance.
- Line up North on the
compass with the top of our map. The grid lines we had on the map were not
perfectly straight and couldn’t be used as a reference.
- Line up the black arrow on
the compass with the line drawn from point to point (Step 1).
- Find the correlating angle.
If the black arrow is lined up correctly with the line from point to
point, and the North on the compass is pointing towards the top of the
map, there should be an angle number indicated by a small white line on
the compass that is the azimuth from one point to the next.
Figure 8: This is an image of the compass we used to find the azimuth between points for the distance-azimuth navigation exercise.
With
this accomplished, we were ready to head out into the field. We had one group
member using the compass to find the azimuth between points and direct the
other members in the right direction by pointing out landmarks that fell along
the correct azimuth. Another member was
a “scout” ahead and would walk in the direction indicated by the first team
member. Finally, the third group member used their pace count and walked in a
direct line to the scout to keep track of distance. We found that we navigated
fairly directly from one point to the next and thought that the technique was
very useful. The only major downside to this sort of navigation is the
preparatory work needed—making a map, learning how to use the compass, and
making sure that we were using the equipment correctly. We also found that it
was difficult to keep an accurate pace count while navigating in a hilly,
wooded area with a lot of snow cover.
Week 3:
GPS Navigation:
For our
second navigation activity, we used only a GPS unit and the coordinates of six
different points to navigate to in the Priory. We worked within the same groups
as before, but were given points in a different course from the previous week.
The GPS units we were using were the Etrex Legend H by Garmin that provided our
current coordinate position and a built in compass. It also allowed us to track
our route using a tracklog function. We
found that the easiest way to navigate between points was to match the given Y
coordinate and the Y coordinate on the GPS and then find the X coordinate.
Figure 9: These were the coordinates of the points we had to find for the GPS navigation exercise. We had to match these numbers to those on our GPS units to find the points.

Figure 10: This is a photo of the GPS unit we were using for our navigation. It is an Etrex Legend H by Garmin.
The
purpose of this navigation exercise was to compare the distance-azimuth
technique with a GPS technique and assess the benefits and downsides to each.
This technique was much more difficult for my group and me because we were
completely blind in the field. We had no sort of landmark to indicate whether
or not we were close to a point other than the coordinates on the GPS unit as
we had with the maps. As can be seen on our tracklog, we were zigzagging across
the area and were most definitely not navigating directly from point to point.
The most valuable aspect of using the GPS unit was being able to access our
tracklog and see exactly where we were on the map. Unfortunately, this is only
useful for post-analysis and did not help us in the field.
After
the navigation was completed, we downloaded our tracklogs and saved them as
shapefiles to be used to create a map in ArcMap. We were able to compare our
tracklogs to one another and see how closely they matched within each group.
Figure 11: This is a map of my individual tracklog from the GPS navigation. My tracklog is marked by the red dots, and the navigation points are marked by the green dots. As can be seen, I did not travel directly between points.
Figure 12: This map highlights the area in which my group and I looped around our own tracks trying to find a point.
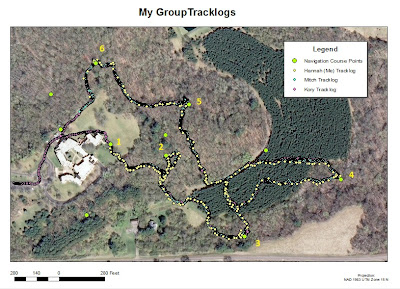
Figure 13: This is a map of the tracklogs collected by the three members of my group. They follow almost exactly the same path but are not perfectly the same. The data was also collected at different time intervals which can be seen by the differences in frequency of the points for each person.
Figure 14: This is a map of all of the tracklogs for the entire class. I sorted the groups by which course they followed, so that each course has six tracklogs in a similar color scheme to better view the data.
Methods:
Fortunately,
for this week, we were able to combine both the GPS and the maps to navigate to
our points in the Priory. Before we went out into the field, however, we had to
revise our maps from week one. The only change (aside from changing the
coordinate system) was adding a Points feature class, which was given to us by
our professor, and adding the No-shooting zones feature class (Figures 15 and 16).

Figure 15: This is the revised elevation map we used for our final navigation. It includes the navigation points and the no-shooting zones.

Figure 16: This is the revised aerial map we used for our final navigation. It was created by Kory Dercks.
Once we
arrived at the Priory, we had to set up our paintball equipment and collect our
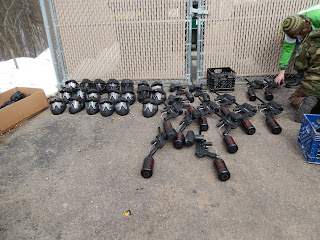
maps (Figure 17). The equipment included a paintball gun, mask, and snow shoes (optional).
I have never used a paintball gun before and had to be instructed how to use it
as well. Apparently, I was pointing the barrel of my gun at people’s faces
unintentionally with the safety lock off. We also had to enable our tracklogs
as we had for the previous week to give us our routes for later analysis. Then,
we were able to set off to find our points. Every group started from the same
point this week, and we had five minutes before we could start shooting other
teams. My group and I seemed to have travelled far from any other groups and
had few interactions with other teams. We had several gun fights and won all of
them except for one. It is possible that I hit someone in one of the fights too
(This is a contentious issue, but I would like to think it was me).
Figure 17: This is a photograph of the paintball equipment my class and I used for our final navigation. Photo credit: Tonya Olson
As far
as the navigation was concerned, we found that we mostly used our map to
conduct the navigation and rarely used our GPS except to mark waypoints that we
would map later, though it was convenient as a secondary resource. The compass
on the GPS would have been useful as well, but it was extremely inaccurate as
we learned with the GPS navigation in the previous week. We found the contour
lines and the aerial imagery most valuable while looking at the maps because we
could associate them with landmarks in the field. My group and I successfully
navigated to 14 of the 15 points and were the second group to complete the
activity, but we were unable to locate one of the points (Figure 18).
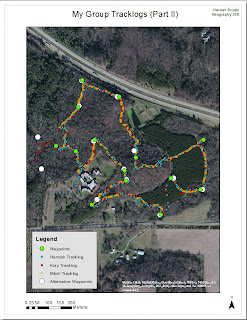
Figure 18: This is a map that compares the waypoints collected by my group and the waypoints collected by another group. As can be seen, we did not find one of the points on the left-hand side of the map (One of our waypoints is missing, but we did navigate to 14 of the 15 points though it doesn't appear as though we did).
After
the navigation was completed, we had to download our tracklog and waypoints to
a computer. This was done using the DNR GPS software. This software was
relatively intuitive—we simply needed to click on the track tab and hit
“download” for our tracklog and click on the “Waypoint” tab and hit “download”
here as well. Then we had to save the data as point shapefiles in the UTM
coordinate system. Once the download was complete and the data was saved as
shapefiles, we were able to create maps of the tracklogs using ArcMap. I
created a map for my individual tracklog (Figure 19), my group’s tracklog, and the class
tracklog.
Figure 19: This is a map of my individual tracklog and waypoints for the final navigation. There were a couple instances where I did not get a waypoint for one of the navigation points, so the waypoint data is incomplete.
Figure 20: This is a map of the tracklogs for my group. As can be seen, we have almost exactly the same routes. At one point, Kory (red) tried to find a point on his own which accounts for the lone red route on the left-hand side of the map.
Figure 21: This is a map of all the tracklog data collected by the class. I organized the tracklog colors for each group so as to better view the data and the routes taken by each group. The waypoints are represented by the large white points on the map.
Results:
This
week’s activity went relatively smoothly in terms of navigation. My group and I
found it much easier and more efficient to navigate using a map along with the
GPS unit as compared to only using the GPS unit. We were able to orient
ourselves by comparing features in the field—ridges, depressions, and so on— to
those on our map. With the GPS unit, we had no reference to go by and ended up
looping over our own tracks at one point. The map was also beneficial because
it allowed us to plan out a route to navigate quickly to every point. By
comparing the tracklogs from the GPS navigation to those of this week, we can
see that we traveled much more directly between points with the map (Figures 22 and 23).
Although
we can’t see the tracklog data for the first navigation activity using the
distance-azimuth technique, I found that this week’s navigation with a map and
GPS was easier than that strategy as well. Using both the GPS and a map
required less preparation and we didn’t have to worry about keeping a pace
count while we were in the field either. Overall we found that a combination of
both the GPS and the maps was the best way to navigate the field. I would argue
that a compass would make the navigation go even more smoothly, because the
compass on the GPS was completely unreliable and finding our compass direction
was slightly difficult.
The
major challenge of this navigation activity was keeping track of the points we
had already navigated to and trying to complete the task quickly. Planning out
the route took a bit of time, but we ended up having to revise our route after
we ran into another team—this is where we became slightly confused about which
points we had already visited and which we still had to navigate to. We also
had an issue after the team we paired up with had lost their map in the snow
and had to share one navigation map among six people. Some of my team members did not have sufficient battery life in their GPS units, either, and their units died before they could finish the course. Luckily for me, my GPS units survived for the entire class period. As with the other
navigation activities, we had to face the added challenge of deep snow cover on
the ground as well (Figure 24). There were times where we would unknowingly step into a
snow drift up to our hips. The paintball gun was also rather heavy to be
carrying around for three hours and added a little more difficulty to the
navigation, too.
Figure 22: This is the same map for the group tracklong data of the GPS navigation as seen in Figure 13, but I wanted it to be compared to the group tracklog data collected for the final navigation. By comparing the two maps and tracklogs, it is clear that the final navigation was much more efficient than the GPS navigation because we were able to use a map.
Figure 23: Again, this is a repeated map, but it is useful to look over it again in comparison with Figure 22. It is clear that we navigated much more directly between points than we had using only the GPS unit.
Figure 24: This is a photo of my grou member, Kory Dercks, from the GPS navigation exercise. It is meant to show the snowy conditions in which we were navigating the field for all three weeks we were at the Priory.
Conclusion:
In
conclusion, navigating in the field can be accomplished using several different
techniques. One is to use distance and azimuth to navigate between points and
requires a map, compass, and pace count. This is a relatively efficient form of
navigation but requires a lot of pre-navigation work. We had to make a map,
learn how to use the compass, and find our pace count. Another is to use only a
GPS unit and try to match the coordinates of a given point to those on the GPS.
This technique seems very simple, but we found it to be the most difficult form
of navigation. Without any reference to our surroundings, we ended up zigzagging
between points rather than travelling directly. Lastly, a combination of these
techniques can be utilized. My group and I found that the combination of a map
and GPS was the most efficient form of navigation. The map was extremely useful
because it allowed us to compare physical features in the field to those on the
map, and the GPS was helpful as well because it allowed us to keep a tracklog
of our navigation that we could use for later analysis.


No comments:
Post a Comment